Saturday, 30 May 2015

From Car Seat Cover to Kokeshi

You know those beaded car seat covers? Well I was given one by someone who didn't want it anymore, with the words "I wondered if you could make something out of this?"

It had round beads and long ones like this


With the help of glue, acrylic paint, permanent black marker and the addition of a few smaller beads for hair, I transformed them into Kokeshi dolls, thus...


These are a few of my favourites as all the others went into a Christmas Fair to raise money for the wonderful charity Challengers.


Thursday, 28 May 2015

Brighton Pavilion by Night

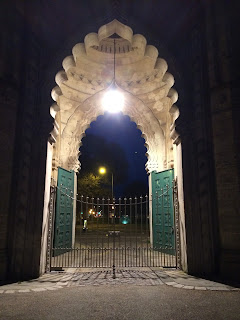
Last time's post was the Pavilion by day but, as it was Eastertime when we went, the days were still quite short so we could fit in the Pavilion by night as well before we had to go home.


It is lit from within so the shapes of the architecture really show out well.


There's a great 'film set' quality to it.


Other buildings in the park nearby add to the grandeur of the atmosphere.


And the pictures come out beautifully when they are funked up with filters.

Monday, 25 May 2015

Brighton Pavillion by Day

Brighton Pavilion (or the Onion Palace, as it has been known), and its surrounding arches and bits, is a fascinating piece of royal whimsy and good fun for taking photographs around. We didn't go in this time but you can walk all the way round the outside and click away to your heart's content.

 
A very imposing gateway

 
Wonderfully detailed domes (onions of the nickname).
 

Towers, pillars and colonnades aplenty.


Stone railings that are detailed like metal ones.


Very detailed tracery


And altogether the aspect of a piece of architecture from another place entirely


It is lit at night and I will show you the pictures I took tomorrow. It would make great film set and reminded us of Luigi's Mansion.


Sunday, 24 May 2015

UTEE Alphabet

UTEE stands for Ultra Thick Embossing Enamel. Its like ordinary embossing powder used for raising images when stamping, pouring the powder on top and heating it till it melts and cools, leaving a raised image. But with UTEE the embossing powder is more like crystals and it is used over a whole surface area to give a complete gloss finish to something.

You can add more crystals while the surface is hot and sticky and keep building up the surface and adding colour or small objects to it which will eventually cool and set into it with a smooth transparent surface like glass or plastic, but slightly waxy to the touch.

I used it to make a series of small alphabet tiles (3x5cms) using stamped images underneath, objects embedded and the alphabet letter stamped into the surface of some just before it set.

Here are the results:

 
And a close up
 

There are lots of UTEE ideas online so check it out if you think you night fancy a go... or just like to browse the crafty world.

Wednesday, 20 May 2015

A Hair-Raising Ride

How are you with heights?

I'm not too bad so when the opportunity came to ride on a chairlift over the cliffs on the Isle of Wight and down to the beach, I went for it.

It started off well at ground level (although at the top of the cliff but not near enough to see an edge of course) and brushed through the trees gradually until you suddenly realise you're out over open air with your legs swinging over nothing-ness.


The view was terrific.


And it was a great way to get down to the beach...


which is where the famous coloured sand is.
But if you don't want to stop, you just stay in your seat and go straight back up again!


Those who like a walk or dislike the thrill of the ride, can take the hill path down to the bottom.

Tuesday, 19 May 2015

Dr Who Airfix: Cyberman

Here is the last of the set of four (previous pages show the others and there'll be a group photo at the end of today's blog).


It's funny how the Weeping Angel looked so manly because now the Cyberman looks rather womanly, and a little bit squat and clumpy... is that what makes it look more like a woman? Ooops!


And here are the gang of four... the Evil Avengers of the Dr.


Many thanks to the Dr Who Adventures comic for the fun it gave me putting them together.

Monday, 18 May 2015

Dr Who Airfix: Sontaran

The third one in the set of four... and all four on one comic! Not a bad giveaway.

So previously we've had the Weeping Angel then Madam Vastra, today its the intergalactic potato-head (no offence intended, but that wouldn't put them off destroying the planet anyway if they happened to be passing... Sontar-HA!).


This was the trickiest one to put together because of the gun across his chest having to stay in the right place while all the other bits and pieces clicked in.


Tomorrow will be the last one in the set and then you can see them altogether in a line, ready for battle alliance.

Sunday, 17 May 2015

Dr Who Airfix - Madam Vastra

Next in line in the 'Airfix' model kit was Madam Vastra, a Silurian and one of the original inhabitants of our planet from way before we evolved.


She came in pieces too and had to be twisted off her frame and clicked together, like yesterday's Weeping Angel.


 She looks a little less elegant than the TV version but still fun to build and good for a freebie.

Friday, 15 May 2015

Dr Who Airfix Models: Weeping Angel

Well probably not technically 'Airfix' as they are not made by the company but you get the idea: models you can make by twisting the little plastic bits from the plastic frame and fitting them together to form the finished model.

Here's the starter kit:


The plastic kit came as a free gift on the front of a Doctor Who Adventures comic... and I can't resist a good Whovian free gift when I see it.

To make it, you have to free all the component pieces and then try to hold everything in the right place at once and then give it a good squeeze. If you do it right then you have an angel (in this case), if not then bits drop out and you have to juggle them back into place. Anyway... no glue required!


The eventual model is about 6cms high and is a distinctly manly-looking weeping angel... odd that most of the ones we've seen so far on the programmes have been rather female (or cherubic). He/ she also has huge hands!

Anyway... there were 4 in the set so more to come soon!

Tuesday, 12 May 2015

Gardening Essentials

Well the plot at the end of the garden is dug over and made into cute little areas for different veg...
like this...


and we've used huge granite slabs to make a kind of veg grave, like this...

 and now it's ready to plant.
What are the Garden Essentials, I hear you cry?

It's these...


Gardening gloves, a trowel, bean seeds, potatoes, a glass of water and giant Yorkie chocolate buttons. In fact they were gone before half the veg was planted. Well, you've got to keep your strength up when you're gardening. It's heavy work!

Thursday, 7 May 2015

Bad Hair Day for a Tree!

Have you ever had a bad hair day?

For us the problem can be solved quite quickly with a brush, a wash or a trim. For a tree it is much more difficult and long lived!

This tree has been taken by surprise when it saw the state its hair was in...

Look at that face


And now look at its hair! No wonder!!


Tuesday, 5 May 2015

When Life Gives You Lemons... or Limes....

MAKE LEMON AND LIME SQUASH!!!!

Some people call it lemonade but I always think it needs fizz for that. Call it what you will, here is the recipe.


You can start with as little as one lemon/ lime and finish up with a mug or cupful of drink. Here I used one of each and ended up with nearly a bottle-ful.


Juice the halves and fish out the pips.


Tip the juice into a large bowl.


Add sugar. This depends on how sweet you like it. I like to add 2 dessert spoons for each lemon but that is still quite sharp...yum!


Mix it up and then add the boiling water.


You only really need enough to melt the sugar but some people use lots and leave it to cool overnight, to get the full flavour out of the pips if they've left them in. I make up the rest with cold water 'cos I can't wait to drink it and usually make it when I feel the need for a citric acid fix!!


If you are not bothered about bits, then leave them in...


If you don't like them and prefer it smooth, then sieve them out!


Use a funnel to tip the lemony-limey-goodness into a bottle to keep in the fridge. You don't HAVE to use a funnel if you prefer to mop all the drink up off the sticky kitchen surface afterwards or if you made it in a glass jug that actually pours properly... mine doesn't!


This bottle was a left over Snapple one of my daughter's and is perfect. It keep well in the fridge for a few day (apparently) but mine doesn't usually last that long before I drink it.

If you have made it too strong you can dilute it down as you go. If too sharp then mix more sugar with a little boiling water and sweeten it up.

Enjoy!

Friday, 1 May 2015

Spirelli or just a wind up.

When I was at school and they were trying to teach us about x and y axis, kind teachers would let us practice by using a ruler and a grid to draw lines from A on the left axis to 10 on the bottom, B to 9, C to 8 etc till the resulting lines looked like a curve. You could do it on all 4 corners and make a fab pattern. Hippy crafty types would do the same with nails on the axis and use thread to make the lines.
The same principle applies to Spirelli but it can be done around a circle/ ellipse etc.

Here's how.
You need a disc with regular notched edges. You can make this by cutting out a card circle with pinking shears (zig zag edged scissors) or use a paper punch as I did here.


Any thread/ cotton will do but sparkly adds more bling.


Tape the start of the thread to the back of the circle and then wind to the front and across at a slant. round one of the little notches and back again via the next one in line, or if that's too fiddly then just wind it right round till the back looks the same as the front. Move along by one notch each time. Carry on till you get back to where you started from then tape it again at the back.


You can choose to overlay another colour. Just go from a starting notch to a different one from last time. The nearer the middle you wind, the smaller the central hole


The middle can be plain or you could add a sticker/ diamond/ whatever you like.


All I had was a Disney Princess so please forgive me!
 

This bottom one was cut out with one of those pairs of weird edged scissors that look great but I rarely seem to find a use for and can never cut straight with.
There doesn't seem to be a real use for the finished article but it is weirdly fun to do!